Agri Vehicles Insurance from Greenlands

Author Topic: building a polytunnel - our experience  (Read 6891 times)

County Dangler

  • Joined Aug 2013
building a polytunnel - our experience
« on: April 04, 2014, 03:22:29 pm »
I thought that some folk might find it useful for me to post my experiences of building a polytunnel and give folk the inspiration to do it themselves.

After much research and negotiations with the usual suspects we plumped for a commercial tunnel from Premier polytunnels. We went for a 24' x 72' and spec'd an upgraded cover, anchor plates, crop bars, storm strengthening kit, timber bases rails and triple ridge kit.

I'm certainly not a professional. I'd class my DIY skill level as 'a confident bodger' (I'm not scared of any job but i don't always get it right!) and have no trade skills. If i managed to do it with minimal help then anyone can.

So the anchor plate option saved having to use concrete and as far as i can see, are just as good but would be far, far easier to dig up should the need arise.

I had a machine on site for something else so too that opportunity to dig 2 2'x2'x75' trenches ready for the anchor plates and foundation tubes.


One of only 2 days that i had help was putting the foundation tubes in as i wanted to get the bit right, so i had a build mate come to see that all of them went in correctly and were square. Back filling those trenches was a hard days graft and it rained all day! To save my back i got a machine back in to finish off the back filling.


and the foundation tubes in


Then the hoops. The main problem we found here was that ideally, you need a perfectly flat surface to put the 4 hoop pieces together on. hands up who has got that right next to where they want there tunnel? All that this meant was that the hoops wern't perfectly straight but that didn't really matter. We also learned at the point that no matter how perfectly you put your foundation tubes in they would need a good boot to fit the hoop over. Perhaps next time i wouldn't have back filled the trenches right to the top.

The first 3 hoops, crop bars starting from the 2nd and the top ridge in place.


That picture also remind me of 1 thing that i would say is essential-a good ladder. for the first day i used the rickety old 6' ladder in the picture. By the time it had sunk in 6'', reaching the 11' ridge to fit the p clip (the clips used to join 1 piece to another) was a nightmare as they are bloody awkward at a sensible height, never mind 20 stone balancing on my tip toes on top of a precarious ladder. I went out and bought a 10' A frame ladder after that and that made life a million times easier and safer.

A couple more hoops up


and after 3 weekends we had the framework up, all of the supports in and the tripe ridges on.


To be continued when i have a little more time..........

Clarebelle

  • Joined Jan 2013
  • Orkney
Re: building a polytunnel - our experience
« Reply #1 on: April 04, 2014, 05:08:39 pm »
wow, that looks like a great tunnel! Thank you for the pictures, sometimes it is easier to know what you need to do when you see the pictures rather than reading instructions. Looks like it was a lot of hard graft to get a tunnel that size to that point.

Dreich Pete

  • Joined Jan 2014
  • Aberdeenshire
Re: building a polytunnel - our experience
« Reply #2 on: April 04, 2014, 06:38:37 pm »
Compared to what I'm looking at, that's a tunnel and a half - then another tunnel. Awesome.

shygirl

  • Joined May 2013
Re: building a polytunnel - our experience
« Reply #3 on: April 04, 2014, 06:43:36 pm »
it looks huge. looking forward to the next instalment...

FiB

  • Joined Sep 2011
  • Bala, North Wales
    • Facebook
Re: building a polytunnel - our experience
« Reply #4 on: April 04, 2014, 08:29:04 pm »
Great share, I'm also looking forward to next set of pics, thanks

County Dangler

  • Joined Aug 2013
Re: building a polytunnel - our experience
« Reply #5 on: April 05, 2014, 10:07:43 am »
Then it was time to start work on the ends. The bit i was dreading most as i never seem to be able to cut straight or get measurements right. I was seriously tempted to pay someone to do it due to this but after reading through the instructions it seemed pretty straight forward so i gave it a go, and I'm glad i did.

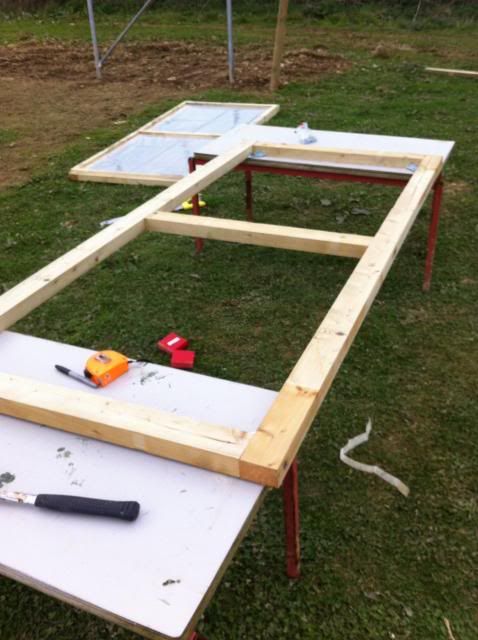
First up was to build the doors. They came in packs with pre cut timber so it was just a case of using little 90deg anglers to screw the shape together then drilling 6mm pilot holes to hammer in some serious 6" nails. Then use a staple gun to cover in the supplied polythene panel and nail in batten over the top of that to cover the panel sand stiff up the door. The quality of the timer supplied all round was second to none.


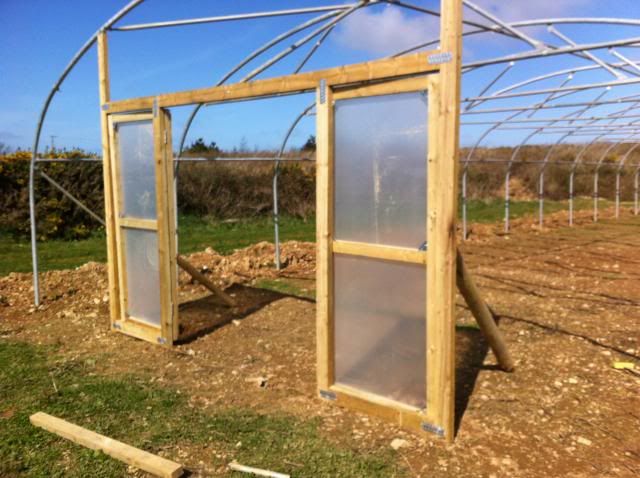
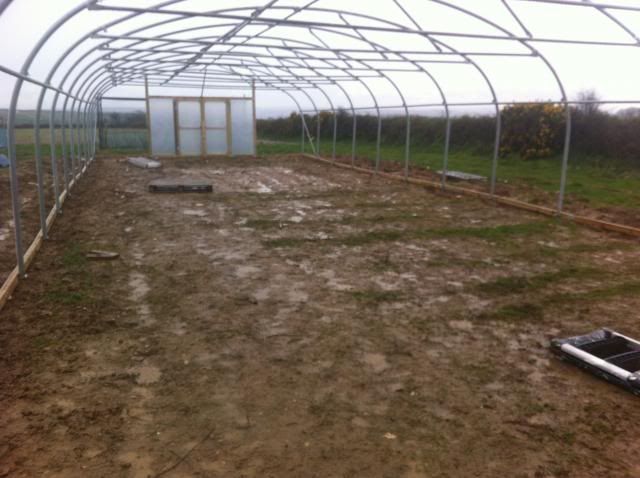
Then onto the verticals, lintels and door posts. Again, easy to follow instructions. Basically, measure, dig a hole, cut post to size, re measure and back fill. Once this post is solid then you've got a datum. Then affix the 3.6m lintel with more massive screws and nail joining panels then do the same on the other side.


Next was the door posts, again measured, dug in, nailed and nail paneled. Offered the doors up and put in the other door post. Then just hang the doors. (the doors are open inwards on the first pic)


Then repeat on the other side


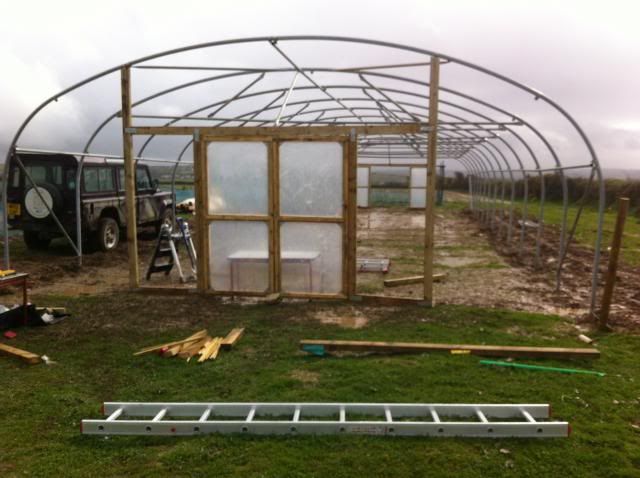
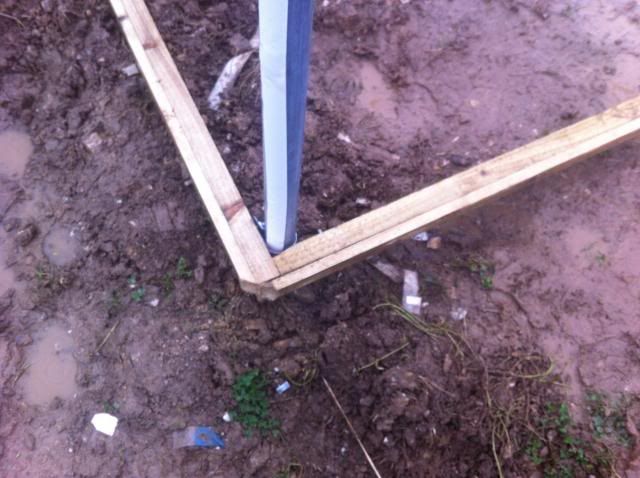
and fill in the panels. Then use the batton to secure and st regthen which also forms a rebate to trap the cover when it comes to that.


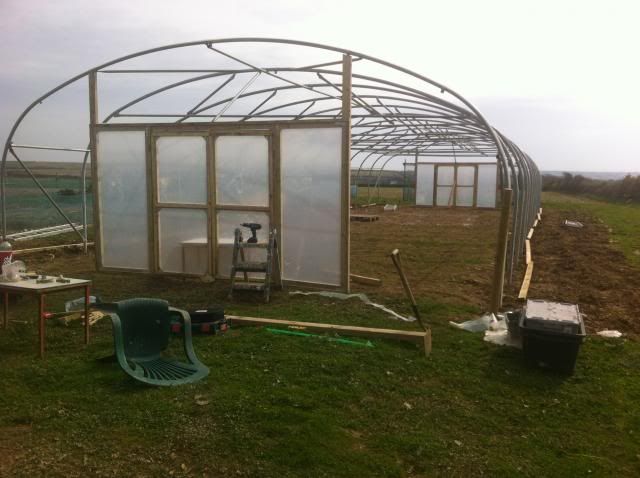
Then the hotspot tape to protect the cover from rubbing against the hoops. Maneuvering the ladder between hoops was a ball ache but my Mrs CA did a sterling job of it.

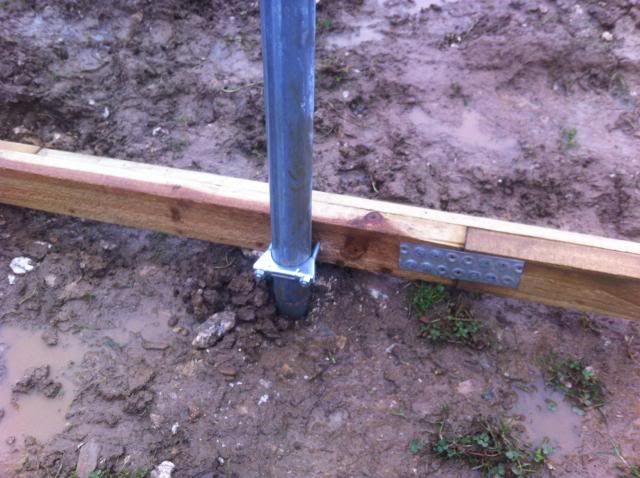
Next onto the timber base rail. This was essentially lengths of 3x2 joined together and clamped onto every post, with a batten nailed along the top to form a rebate.


The worst job of the lot next....self tapping screws to hold the job lot together. If i never see a self tapping screw again it will be far too soon. The screws supplied were good, strong screws as they have to take a bit of weight but due to this they were quite thick and a real pain to get in. Now bear in mind the often they were going through 3 walls of aluminium, starting on a curved surface, at ever place a tube met a tube or a clip, on top of a ladder, always bearing in mind where the cover will go so often in an awkward location and you will begin to feel my pain. It was an awful job but it had to be done. 300 or so screws, 1 dead drill, 1 new drill and lots of holes in my hands later it was done, aside from the ones that secured the hoops to the foundation tubes as the would have gotten in the way of the bail rail clamps.

I was really lucky to have some expert help with the cover. A mate from my fishing club has a big farm and nursery and has skinned at least 1 commercial tunnel every year since being knee high to a grass hopper. He also kindly brought along his head farm worker to help too. Also Harry, a chap I'd met on a bee keeping course and at cornwall smallholders came along with his wife to lend a hand and see how it was done.


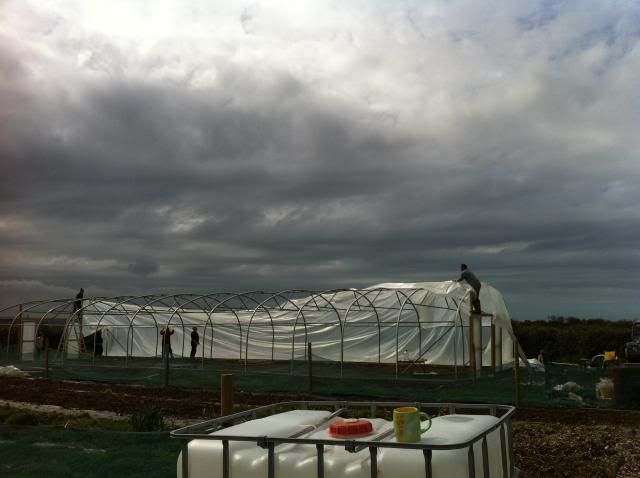
and 3 hours later it was done!


I can't imagine how much more awkward it would have been without help but they made it easy for us. I didn't get any pics of the base rails being done as i was busy supervising but basically the cover was pulled tight, rolled around a length of batten, this then sat under the top batten and was nailed in place.


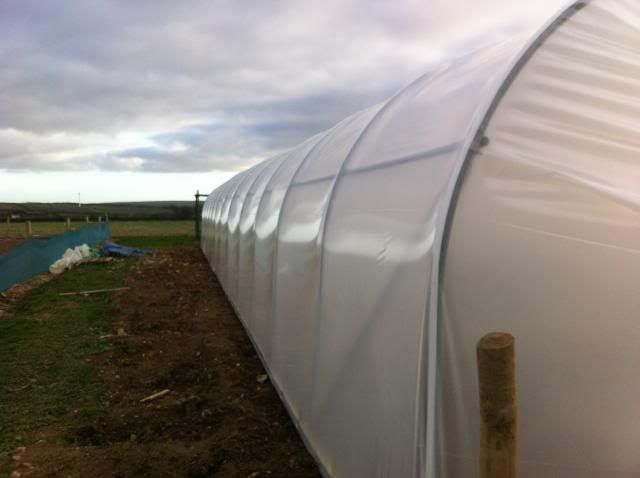
We are really please with it. I can't remember exactly how much it cost but I think it was in the region of £3k which seemed like a lot at the time but it looks like very good value now. It's rock solid and very well manufactured. Everything it came with was spot on, even down to the nails and screws.

The instruction lacked a bit of detail in certain places but on the 3 occasions i called to ask, my questions were quickly answered by the lady that answered the phone. We were also 3 packs of P clips short and these were sent out first class in the same days post. Superb service.

I wouldn't hesitate to recommend premier tunnels and also saving yourself the circa £1.5k we got quoted to build it.

I hope this help a few folks and feel free to ask if you have any questions.


Dreich Pete

  • Joined Jan 2014
  • Aberdeenshire
Re: building a polytunnel - our experience
« Reply #6 on: April 05, 2014, 05:49:29 pm »
Cracking tunnel. You must be well chuffed with it. Some photos of the fixtures & fittings would be great as the project progresses.

Got to say; £1.5k to build it seems a bit steep. No satisfaction in paying somebody either, not when you've done such a brilliant job yourself (plus helpers).

ZacB

  • Joined Apr 2012
  • Suffolk
Re: building a polytunnel - our experience
« Reply #7 on: April 06, 2014, 07:45:40 am »
Thanks for taking the time to write up.....great post  :thumbsup:

goosepimple

  • Joined May 2010
  • nr Lauder, Scottish Borders
Re: building a polytunnel - our experience
« Reply #8 on: April 06, 2014, 08:36:42 am »
Yes a brilliant post, thank you so much for putting that on.


We had to deconstruct ours a couple of years back and will be building it up again - we didn't build it first time round so that was great to see.  We have 2 actually, one we are covering in mesh to use as a fruit tunnel, will have to put some things on to stop wee birds getting tangled though.


Loved that last picture with the rain clouds rolling in.  Once the good weather comes you'll be pleased as punch and pulling it all together will seem ages ago.


Well done, great job.  :thumbsup:
registered soay, castlemilk moorit  and north ronaldsay sheep, pygmy goats, steinbacher geese, muscovy ducks, various hens, lots of visiting mallards, a naughty border collie, a puss and a couple of guinea pigs

ladyK

  • Joined Dec 2012
  • Conwy Valley
Re: building a polytunnel - our experience
« Reply #9 on: April 06, 2014, 09:17:35 am »
Great post, thanks for sharing all this enlightening progress info.
And what a fantastic result you got!
"If one way is better than another, it is the way of nature." (Aristotle)

chrismahon

  • Joined Dec 2011
  • Gascony, France
Re: building a polytunnel - our experience
« Reply #10 on: April 06, 2014, 09:27:03 am »
Very impressive job County Angler and brilliant pictures and explanations with it. Definitely a reference source for years to come. Makes our 'big' polytunnel look absolutely tiny!

County Dangler

  • Joined Aug 2013
Re: building a polytunnel - our experience
« Reply #11 on: April 06, 2014, 09:33:43 am »
Thanks folks.

Many forums are often take, take, take. I know I have had a few questions to ask and I'm sure to have many more, so it's nice to give a little back.

I'll keep the thread updated with how things progress.

shygirl

  • Joined May 2013
Re: building a polytunnel - our experience
« Reply #12 on: April 06, 2014, 11:31:15 am »
its really helpful to know how its done for when we eventually have ours.
its huge. what are your plans for it?

 :thumbsup:

County Dangler

  • Joined Aug 2013
Re: building a polytunnel - our experience
« Reply #13 on: April 06, 2014, 04:48:05 pm »
its really helpful to know how its done for when we eventually have ours.
its huge. what are your plans for it?

 :thumbsup:

Mrs CA resigned from her job last term and is now setting up as a flower grower. And we also plan to sell produce on a small scale to local chefs and hotels. Small scale, high quality and unusual varieties is the plan. Also we have several campsites within a mile or two and thousands of tourists pass our place everyday so a roadside stall with honesty box is another possibility. It's really a case of suck it and see. Who knows which road we will end up going down.

goosepimple

  • Joined May 2010
  • nr Lauder, Scottish Borders
Re: building a polytunnel - our experience
« Reply #14 on: April 06, 2014, 07:00:22 pm »
well good luck to you both, a friend from years back made quite a successful business growing lillies in a big polytunnel like that.
registered soay, castlemilk moorit  and north ronaldsay sheep, pygmy goats, steinbacher geese, muscovy ducks, various hens, lots of visiting mallards, a naughty border collie, a puss and a couple of guinea pigs


Forum sponsors

FibreHut Energy Helpline Thomson & Morgan Time for Paws Scottish Smallholder & Grower Festival Ark Farm Livestock Movement Service

© The Accidental Smallholder Ltd 2003-2024. All rights reserved.

Design by Furness Internet

Site developed by Champion IS