Agri Vehicles Insurance from Greenlands

Author Topic: polytunnels - any experience to share?  (Read 12660 times)

mini_cj

  • Joined Feb 2008
polytunnels - any experience to share?
« on: February 27, 2008, 09:24:42 pm »
Not content with our new hens, we're considering going for a polytunnel this year.  I've started doing some research and there seems to be a lot of conflicting advice out there.  Has anyone put one up recently who could share some tips - eg what method of fixing it, what extras are worth buying etc?  We've got plenty space and are keen to grow as much veg/strawbs as time permits, but is bigger really better?  What about cross-bracing, door types, polythene types etc - wow, there are so many decisions to make!!

Guy

  • Joined Feb 2008
  • East Devon
Re: polytunnels - any experience to share?
« Reply #1 on: February 27, 2008, 09:46:48 pm »
well mini -cj - i guess it depends on your location and plans for the tunnel. the oh and myself bought ours late last year , it has increased our out of season growing space enormously. we went for a 20 ' by 10' due to our space limitations , my advice would be go for as big a one as you can afford/accomadate. ours already seems overly full (but perhaps we just need to be tidier :D) with regards to the extras, that also depends on your usage/weather conditions etc. eg cross bracing for vunerable sites etc.we put a raised bed along one side and staging along the other and already have our first lettuce and carrots coming along nicely. the only aspect we havent fixed currently is lighting, as we both work full time our activities are confined to days off, we had hoped the tunnel would give us scope this time of year to be out more in the evening , but until the light isssue is fixed - not. again door types are down to personal useage weather or not you want to keep machinery etc. inside-we have 1 normal and one wide door which is sufficient for our lawn mower.we fixed ours with the base rails as this not only gave a better finish but , as we would have had to dig the trench by hand , made it a lot easier. we worked together with the measuring and getting the spacing right , but i constructed the rest by myself - indicating that if i can do it , anyone can!! :D(dont know how feasible with a biggeer one though) also choose a windless day to put the cover on lol :D
relax and enjoy life - let others do the worrying

mini_cj

  • Joined Feb 2008
Re: polytunnels - any experience to share?
« Reply #2 on: March 02, 2008, 04:59:23 pm »
Thanks Guy.  I really hadn't thought about the lighting thing at all!  I think we'll go for the base rails too as I don't fancy digging trenches either.  Great to hear you've got crops underway already too.  I've just got the brochure from First Tunnels and it's quite good at explaining what all the options are for, so together with your advice I feel a bit better prepared.  Cheers again.

Guy

  • Joined Feb 2008
  • East Devon
Re: polytunnels - any experience to share?
« Reply #3 on: March 02, 2008, 07:59:00 pm »
Hi mini-cj , no problems! we purchased ours through first tunnels to , and found them really helpfull and efficient (just dont lose the instructions for the door frames like i did and have to make it up 'cause i was too impatient to await another copy to arrive!!!!!) :D
relax and enjoy life - let others do the worrying

resistance is fertile

  • Joined Apr 2008
Re: polytunnels - any experience to share?
« Reply #4 on: May 05, 2008, 02:50:12 pm »
here is a post I put up elsewhere, but thought it might be interesting and can certainly save alot of cash as well as give you a flexible space, which is something that a fixed tunnel can sometimes fail to be.

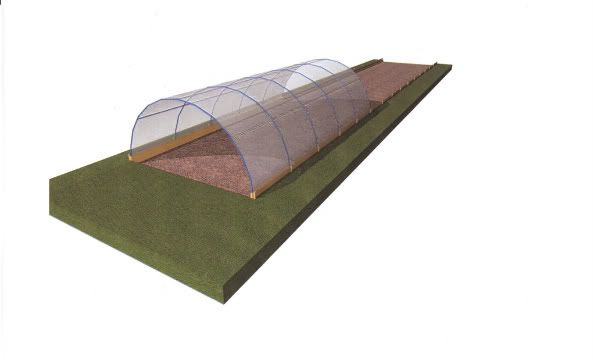
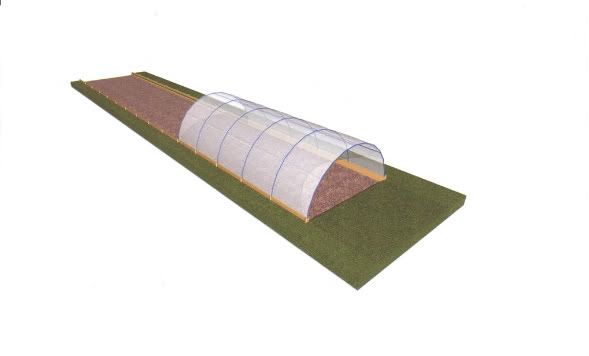
Here are the sketches of our sliding polytunnel contraptions, they are cheap and effective and are more flexible than static systems for season extension (or just keeping out of the rain!  ) We use removable end panels with a door overwinter.

Any technical queries or suggested improvements please let me know, cheers!


Sorry about quality of pics but they are scans as I dont know how to stick my Archicad files on here   
 
This is something you build not buy. Its a cheap alternative to many professional set ups and can be constructed very easily. To save sending tons of seperate messages I will lay it out as simply as possible. It can be done by two people in a day quite easily, with some basic tools and a bit of sweat.

1. Set out the rails by putting in a string line and banging in some short stakes, we used treated 2x2, about 2' long at some 4' spacing. You can form rails either twice or three times the length of your tunnel, depending on how many beds you intend to use under the tunnel. The rails are set out parallel and spaced apart the width you want you tunnel to be.

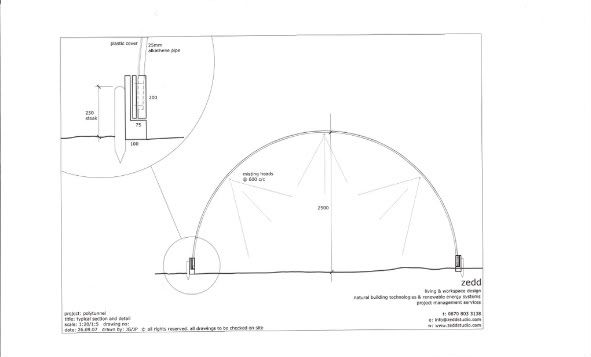
2. Fix the rails themselves to the inside of the line of stakes with some large 4" screws. We used a section of 9x2 with a 3x2 fixed to the inside bottom edge of this, this creates a ledge which the tunnel runners slide on. ( a good bit of candle wax works wonders on this and makes sliding even a big tunnel really smooth!)

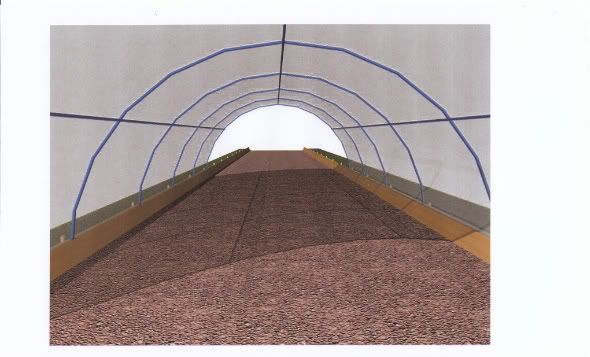
3.The tunnel is then constructed out of 1" or 1 1/2" blue alkathene water pipe. This is very cheap and comes in 50m rolls. Simply cut a suitiable length that will give you a curve of sufficient height and width for what you want and then cut as many of these as you require to form a tunnel of the right length when spaced at 6' apart.

4. Each end of these pipes is then inserted into a 4" deep hole drilled into the top of a 6x3 treated plank. These planks are slotted onto the ledge in your rails, and the pressure created by the bent sections holds everything tight against the outer rail.

5. Now you have your basic hoops you add some more pipes lengthways inside the curves to hold all the hoops together. (some diagonals at each end help if its a big tunnel) These pipes can be clamped in place with pipe clamp fittings from a plumbing supplier which are tightened around the hoop section and then the long pipe crossing it.

6. Then you cover the entire structure in your polythene sheet. This is best done from one side, where you fix a 2x1 batten to the runner along the bottom to clamp the plastic in place. Then pull the cover over tight and use another batten to clamp the other side. Then tuck the ends inside pulling them tight and securing with polytunnel sticky repair tape.

7. There you have your basic tunnel which can be used to start early crops in one position then moved to expose them once underway and then it forms a summer cover for tender crops before moving on again to extend your season by covering some late salads etc. We find this stops the tunnel space being takebn up by crops that would be fine outside once established. The possible combinations are endless especially combined with cold frames as well!

8. You can then add removable end panels with a door flap, made of more curved alkathene but with a piece as a base rail (the corners connect with pushfit plumbing joints) covered in polythene.

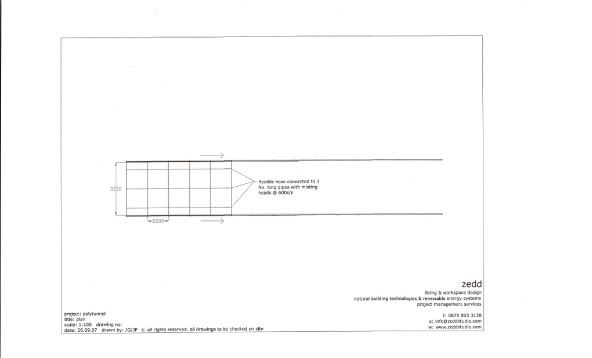
9. We put end caps on our three longways pipes and connected them to the hose so that they are full of water under pressure and have little sprinkler head (the little ones that you pull 'on' and push back in to turn 'off') every 2' so that there is no seperate watering equipment as it is part of the frame itself.

Hope this helps, happy growing all year round !!!!


MrRee

  • Joined Jan 2008
Re: polytunnels - any experience to share?
« Reply #5 on: May 05, 2008, 04:35:06 pm »
Fantastic,never thought about putting it on sliding rails,and like the irrigation system idea too. Here's a link I posted on a different thread in here that shows a basic,cheap design,but I much prefer RiF's "new and improved" version.......

http://www.overthegardengate.net/UserPages/pp_view.asp?FName=polytunnel&Page=1   

 .... Ree
They don’t join cliques — more times than not, they stand alone — but they recognize and gravitate towards one another. Only warriors understand other warriors.

Marecotierre

  • Joined Nov 2008
Re: polytunnels - any experience to share?
« Reply #6 on: November 18, 2008, 07:40:13 am »
I really like this idea.....thanks for posting.

garden cottage

  • Joined Sep 2008
  • forest of dean
Re: polytunnels - any experience to share?
« Reply #7 on: January 26, 2009, 06:50:17 pm »
brilliant polytunnel link ree

templecloud

  • Joined Jan 2009
Re: polytunnels - any experience to share?
« Reply #8 on: January 31, 2009, 02:57:01 pm »
This sliding polytunnel is a fantastic idea!   We'd love to have a polytunnel having lost all our tomatoes for the last two years to blight - but the real problem is planning permission.

Does anyone have any advice about this?  From my brief glance at this forum I haven't seen it mentioned.
But a search on my local council site produces at least a dozen recent cases of people being told to remove polytunnels put up without permission...

Helen

  • Joined Feb 2009
Re: polytunnels - any experience to share?
« Reply #9 on: February 07, 2009, 06:19:39 pm »
Our polytunnel is on agricultural land and Buckinghamshire planning department insist on planning permission.  We decided not to try and get away without this as the polytunnel is visible from a public footpath.  It cost about £50 in fees and I had to provide plans and elevations with the form, which were easy enough to draw.  We purchased ours from First Tunnels last year and have been very pleased with it.  We went for a 20' x 14' with all the extra bracing as it is on a windy site.  We also have ventilated sides and ridge as everyone I spoke to told me heat was an issue in theirs.  We are installing raised beds as the area tends to get waterlogged in winter and plan to try a seap-hose for irrigation this summer.  Polytunnel today got up to 66 degrees - seemed weird to be nice and warm yet surrounded by 6 inches of snow.  Nighttime temperature in the tunnel has been down to -12 this year.

xxmillyxx

  • Joined Jan 2009
  • East Yorkshire
Re: polytunnels - any experience to share?
« Reply #10 on: February 07, 2009, 07:00:54 pm »
I have just received my new polytunnel in the post this week. 
I got it off e-bay but it was First Tunnels who put some on there at a discounted, all in price (no need to go through the process of selecting different aspects - which was easier for me as I am very indecisive at times).
Once I had purchased I contact the seller (which was first tunnels) and just ordered a few extra pieces - crop bars,etc.  These were all sent with the original order and I did not pay any postage costs for anything.  I think I got a good deal all in all.

Some firms - i.e. first tunnels -  sometimes put items on ebay when they are having a slow period, so I would suggest keep having a look.
Milly

mistryer

  • Joined Feb 2009
  • Dordogne, France
Re: polytunnels - any experience to share?
« Reply #11 on: February 17, 2009, 04:41:11 pm »
This has all been really helpful to me also, as I am also planning the polytunnel route this year - has anyone found anything they cant grow in a PT??

M
a smile a day, keeps the doldrums at bay :-)x

garden cottage

  • Joined Sep 2008
  • forest of dean
Re: polytunnels - any experience to share?
« Reply #12 on: February 22, 2009, 09:02:50 pm »
a money tree!. Ive just finished putting up our first direct polytunnel, 21x14 one thing i will mention is door frame height, if you go by instructions door height is under 6ft thereby just the right height to crack your forehead if your 6ft2 like me. solution is cut off the upright stubs at the top so there flush with the door top then extend the bottom of the door. I can now walk in and out without bruises.

rustyme

  • Guest
Re: polytunnels - any experience to share?
« Reply #13 on: February 22, 2009, 09:10:27 pm »
I knew there had to be a good point to being a short arse like me ....5'9"....you lankey buggers will keep growing .... ::) :o ;D

cheers

Russ

ps ...mind the beam ....donk.....hehehe


Forum sponsors

FibreHut Energy Helpline Thomson & Morgan Time for Paws Scottish Smallholder & Grower Festival Ark Farm Livestock Movement Service

© The Accidental Smallholder Ltd 2003-2024. All rights reserved.

Design by Furness Internet

Site developed by Champion IS