Agri Vehicles Insurance from Greenlands

Author Topic: Our home-made Chicken Setup (Long, Pic Heavy!).  (Read 6336 times)

Womble

  • Joined Mar 2009
  • Stirlingshire, Central Scotland
Our home-made Chicken Setup (Long, Pic Heavy!).
« on: September 14, 2009, 07:26:11 pm »
A couple of friends have recently asked about our setup, and I thought this info might also be useful for other folks, so I thought I'd post it here too.

We currently have just a couple of Black Rock hens. They are lovely natured, and usually give us 12 eggs a week at the moment. They are soon to be joined by a couple of Welsummer hens, as we like the thought of them laying chocolate eggs!  ;D.

The run measures approx. 4.5m x 3.5m, and was made by knocking 3” fenceposts into the soil. The netting was then stapled to the posts. I used 1cm weldmesh in two horizontal strips. The first forms a ‘skirt’ to discourage foxes from digging, and the second, higher layer should hopefully prevent them from chewing through. I also dug a trench 1’ deep between the posts, and sunk some bits of old sheet metal I had, again to discourage digging. The top ‘strip’ of netting, and roof are just standard chicken wire. The roof is high enough so we can walk around inside without stooping.


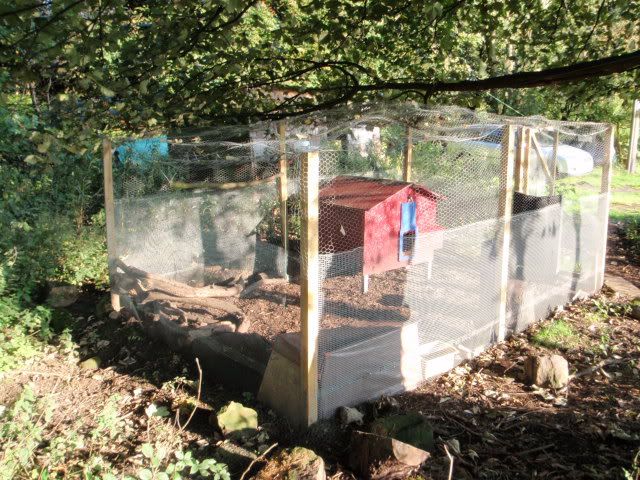
The floor of the run started off as sparse grass, then quickly became thick mud, given the glorious summer we’ve had!  This was sorted out by putting down a layer of bark chippings, which has greatly improved matters, and allows the birds to scratch around to catch the woodlice who have now moved in!


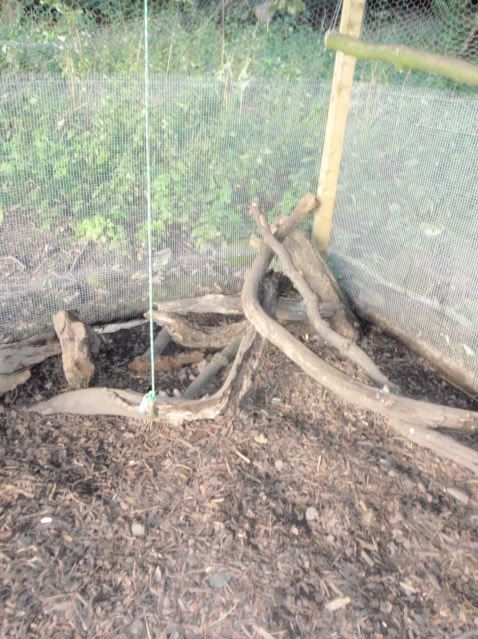
The string you can see in this photo is for hanging up cabbage leaves etc for them to peck at, and the high perch on the right is where they sit for their mid-morning snooze!

I copied the house from a commercial one I found on the internet, and modified to suit our setup. The main compartment is 1m wide x 1.25m deep.


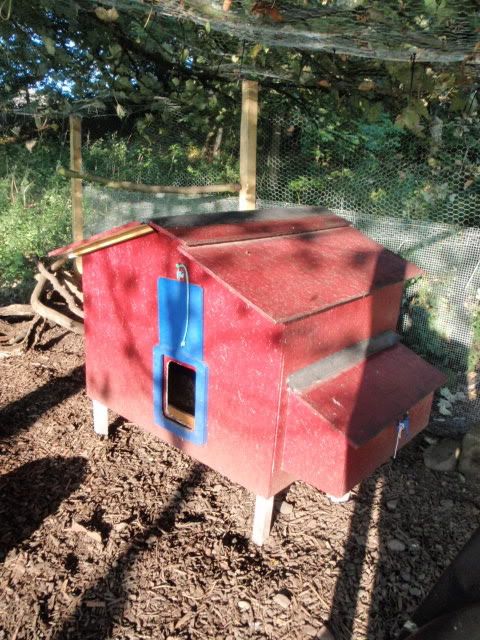
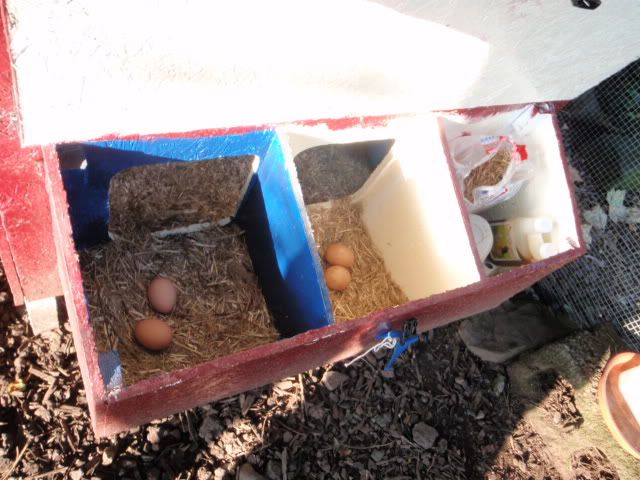
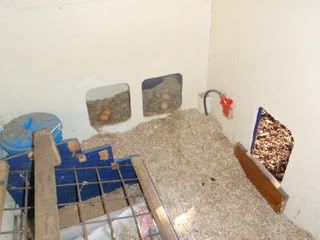
The house has an external nesting compartment, divided into three segments. Two of these are nest-boxes, and one is for storing bits and bobs. If I had my time again, I’d make the floor of the nestboxes at least 6” higher than the floor of the house, not the 3” I chose, but this is a minor point. The nest boxes are roughly 10” square. I painted one of the nest boxes blue, just to see if they'd have a preference - they don't!  :D

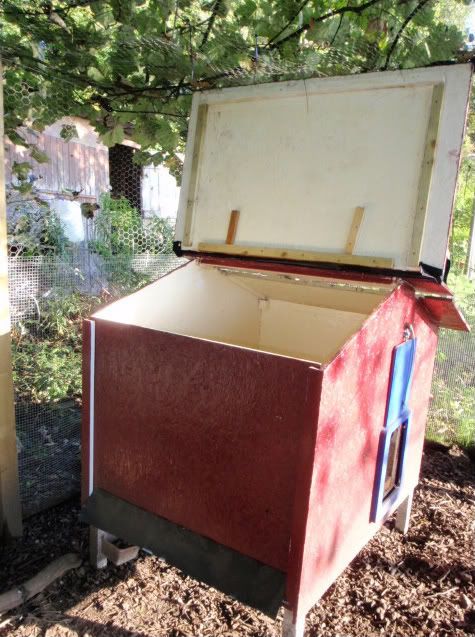
One half of the roof hinges up for day-to-day access, whilst one of the sides slides up and out for cleaning. Overall, this arrangement works very well. The hinged roof apex and removable side are weather-sealed with a strip of damp-course polythene stapled in place. The gap in the non-hinged roof section is to provide ventilation, and is sealed with fine weld-mesh.
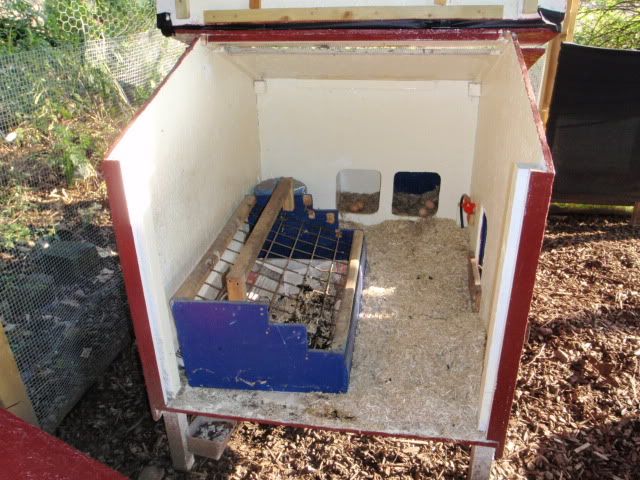
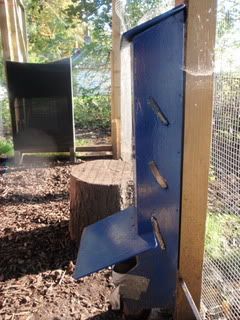


I wasn’t initially sure what to do re perches, so I made a removable rack, as follows:


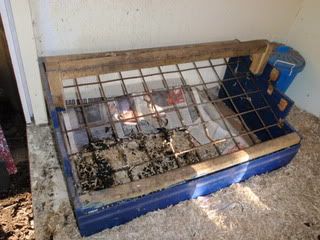
The perch is 400mm off the floor, made from a 2”x2” and has a grid beneath, to allow droppings to pass through, but not chickens  ;). Since they do most of their droppings at night, these are all contained in a plastic tray under the grid, and can’t be scratched about by the hens. Since the hens are out and about most of the day, they never foul the rest of the house, so cleaning is just a matter of emptying the plastic tray into the compost once every 6 weeks or so. We use Hemcore for bedding, which works very well.

Here you can see an inside view of the pop-hole. I had to put an extra piece of wood in here, to stop the hens from scratching all the bedding out of the door. This makes the base of the hole 150mm above the floor level, which is about right. The pop hole measures 240mm wide x 200mm high, which again seems about right. My one regret here is that I didn't make the nest boxes a bit higher above the floor level, and didn't make the 'threshold' higher to get into them, and to stop the hens from kicking the eggs out of the box (they only do this occasionally, so it's not a big deal).


Water is provided from a home-made drinker, which is just a bottle with a hole in the base, sat in a plastic tray:


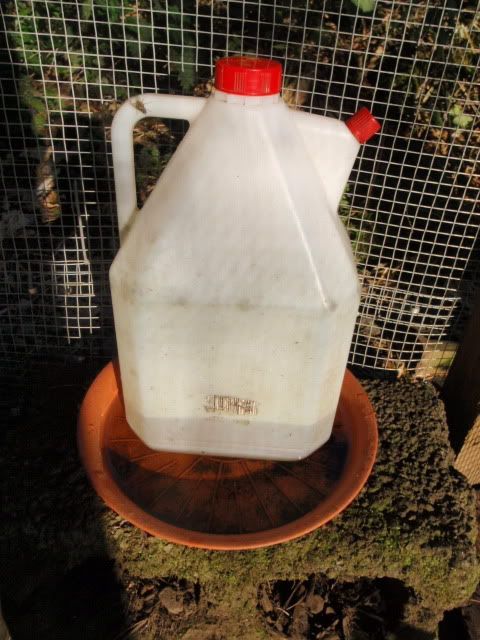
I also installed some drinker cups, fed from an external 15 litre drum, but the hens don’t seem to use them too much.


The feeder is again made from plywood, and has windows in the side so you can see how much feed is left. It holds 2 weeks supply for two hens. The duct tape is to stop one of the hens (grrrr) from scratching everything out up the sides of the trough, and onto the ground. I’ll get around to sticking some wood corners on at some point to fix this permanently!


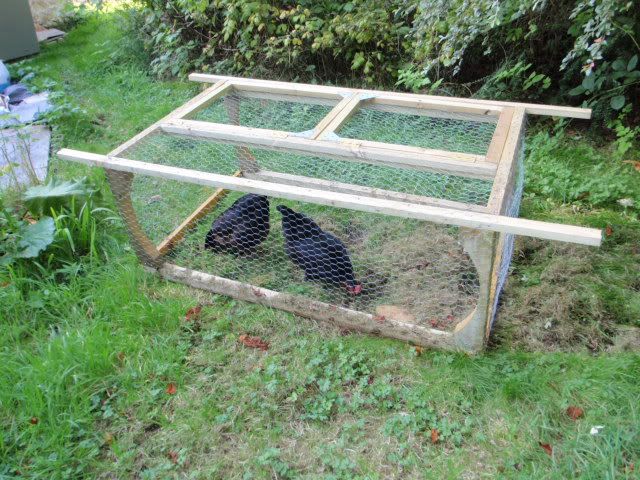
I also made a wee movable ark, which we put the birds in for an hour or two every night to allow them to scratch about in the grass for a bit.


What I’d do differently next time:

  • Use WBP plywood for the house, not OSB – this was a false economy, since the OSB soaked up used three times as much paint, and also dirt / poo etc. tends to sit in the rough surface.
  • Reduce the dimensions of the house to 0.9m x 0.9m – since you can’t stand in the house itself, it’s a pain not to be able to reach the far side.
  • Increase height differential between nest boxes and main house to 6”.
  • Make sure the base of the pophole is at least 6" above the floor level, to prevent bedding from being kicked out.
  • Put a window in the house (future job!) – it’s awfully dark in there!!
  • Cover over some of the run to keep it dry. The hens seem to love the rain, but I don't want them catching a chill in winter

So, that’s about it!  I’m still very much a beginner at all this, so I’d welcome comments or criticism from the old hands on here, particularly if you think I’ve gone wrong somewhere!! Still, I'm very pleased with how well this setup is working so far, and all for way less than we'd have paid for a commercial house / eglu  :o / etc. 

Please do ask questions if anything is unclear.

Cheers!

Womble.
« Last Edit: September 14, 2009, 07:36:05 pm by Womble »
"All fungi are edible. Some fungi are only edible once." -Terry Pratchett

Rosemary

  • Joined Oct 2007
  • Barry, Angus, Scotland
    • The Accidental Smallholder
Re: Our home-made Chicken Setup (Long, Pic Heavy!).
« Reply #1 on: September 14, 2009, 08:15:15 pm »
All I can say is that I'm well impressed.

MiriMaran

  • Joined Feb 2009
  • Derbyshire
Re: Our home-made Chicken Setup (Long, Pic Heavy!).
« Reply #2 on: September 14, 2009, 08:31:55 pm »
WOW!  And how fantastic to share your efforts with us all - I'm sure someone who is setting up will be very useful.  TAS needs a new section for threads like this so they can be easily found and this will eventually get lost amongst the chit chat which would be a shame.  Well done and yes I still love your profile pic!!!!!

sandy

  • Guest
Re: Our home-made Chicken Setup (Long, Pic Heavy!).
« Reply #3 on: September 14, 2009, 11:13:25 pm »
Love the idea that the side comes of the hen house, much easier to keep clean, yours lookd good enough for me to move into lucky birds!!!!!

cmorrell

  • Joined Jan 2009
  • Kirkintilloch, NE of Glasgow
    • Calum Morrell Photography
Re: Our home-made Chicken Setup (Long, Pic Heavy!).
« Reply #4 on: September 15, 2009, 05:55:02 pm »
Absolutely incredible post, thank you!

This is almost exactly what I'm planning on doing myself early next year with the intent of having a few chickens in place by late spring .. I may well have a few questions for you in the near future  ;D

daniellestocks

  • Joined Jun 2009
  • Nr Pickering, North Yorkshire
Re: Our home-made Chicken Setup (Long, Pic Heavy!).
« Reply #5 on: September 15, 2009, 06:31:42 pm »
Impresive! Lux chux accomodation!  lol :chook:

cameldairy

  • Joined Aug 2009
  • Cairo, GA U.S.A.
  • South Georgia, U.S.A.
Re: Our home-made Chicken Setup (Long, Pic Heavy!).
« Reply #6 on: November 02, 2009, 08:33:34 pm »
I love your set up. Some really good ideas and photos. Thanks. :chook:
1 wonderful husband, his 200 beehives,13 chickens, 8 camels, 4 zebra, 21goats,  2 pigs, 4 dogs, 1 horse, 2 ponies, 1 donkey and 1 capybara.

CameronS

  • Joined Aug 2009
  • North East Fife
Re: Our home-made Chicken Setup (Long, Pic Heavy!).
« Reply #7 on: November 03, 2009, 08:25:29 pm »
Wow, thats a lot of work you put into it
, thanks for poasting the info, i'm trying to persuade dad to help my build a new one so at least now i hae some form of persuasion,

Victorian Farmer

  • Guest
Re: Our home-made Chicken Setup (Long, Pic Heavy!).
« Reply #8 on: November 01, 2011, 12:20:26 pm »
very good I'm going to build this in Ting and groove you done very well .

Big Light

  • Joined Aug 2011
    • Facebook
Re: Our home-made Chicken Setup (Long, Pic Heavy!).
« Reply #9 on: November 02, 2011, 08:45:43 pm »
Looks good,lots of work gone into it :thumbsup:, so don't want to rain on your parade but better watch out in case we have snow like last year otherwise it will sit on the roof and pull/cave it all in. Some cross timbers / middle support may prevent that ( or just lots of brushing/poking of the roof mesh when the snow falls)
Good luck

bigchicken

  • Joined Nov 2008
  • Fife Scotland
Re: Our home-made Chicken Setup (Long, Pic Heavy!).
« Reply #10 on: November 02, 2011, 09:33:33 pm »
Very well done a good set up . Reminds me of the time a young lad came with his mother to buy a ferret from me,  I told him to take two as they would be company for each other he agreed and went away as happy as Larry A few months later I got a phone call from his mother asking if I could take the lad out ferreting as he was having no luck dew to his inexperience. I  offered to take the lad out and show him the ropes and arranged to pick him up on the following sunday morning. When I arrived on the dew date he proudly took me round to his ferret hutch and what a hutch and all his own work it was nothing short of fantastic just like yours cheers
Shetland sheep, Castlemilk Moorits sheep, Hebridean sheep, Scots Grey Bantams, Scots Dumpy Bantams. Shetland Ducks.

ellied

  • Joined Sep 2010
  • Fife
    • Facebook
Re: Our home-made Chicken Setup (Long, Pic Heavy!).
« Reply #11 on: November 04, 2011, 09:16:32 am »
Thanks for that detail and the photos, I am inspired to have a go at the 2nd coop for myself now rather than buy one, but if you fancy a wee holiday in Fife sometime let me know ;)  I too have a mark 1 run with a "do differently" list of things I'd like but the coop in the middle is an ebay one so nowhere near as clever as you :)
Barleyfields Smallholding & Kirkcarrion Highland Ponies
https://www.facebook.com/kirkcarrionhighlands/
Ellie Douglas Therapist
https://www.facebook.com/Ellie-Douglas-Therapist-124792904635278/

Womble

  • Joined Mar 2009
  • Stirlingshire, Central Scotland
Re: Our home-made Chicken Setup (Long, Pic Heavy!).
« Reply #12 on: November 04, 2011, 09:58:57 am »

Hi,  Thanks for the compliments folks.  I should say that this post was originally from a couple of years ago, and we have now moved house (and coop) to somewhere with more space, and our hens now free-range. The coop is still going strong though, and even has a double-glazed window installed which I rescued from a skip - complete with frosted privacy glass!  The lift-out side has proved to be a real boon, and with 90% of the droppings being caught by the tray under the perch, cleaning out only takes a few minutes every week.

Another thing I did was to make an automatic door closer out of a bit of rope with a rock tied to it. With the right size of rock, the door closed nice and gently, which saved having too many escapes when coming and going with my arms full!!

The run worked  very well for the time we had it, and snow could just be 'bounced' off the mesh roof with a pole easily enough. I found that fallen leaves were a bigger problem, but again, as long as you kept brushing them off regularly, they weren't too much hassle. Of course, having a small fixed run like this did mean it could get a bit muddy at times. We got round this by putting down bark chippings, which were available locally at very low cost. I know from another thread that this is perhaps controversial, but it worked very well for us.

Hope that helps!
"All fungi are edible. Some fungi are only edible once." -Terry Pratchett


Forum sponsors

FibreHut Energy Helpline Thomson & Morgan Time for Paws Scottish Smallholder & Grower Festival Ark Farm Livestock Movement Service

© The Accidental Smallholder Ltd 2003-2024. All rights reserved.

Design by Furness Internet

Site developed by Champion IS